Archives for February 2011

Diamant Review

Back overseas, I still wanted and needed a good mill. With a kind tip from Lehman’s Hardware, who sell the Diamant in the USA, I was able to contact the Diamant D.525 mill manufacturer in Denmark (this was in 2003; now the Diamant is made in Poland and is sold by a different outfit overseas. Lehman’s still carries them in the USA, but at over $1200 plus shipping! The price is so high because of the dollar being currently weak against the Euro. In 2003, I was able to buy the mill in Europe for about $350, when the dollar was much stronger against the Euro.


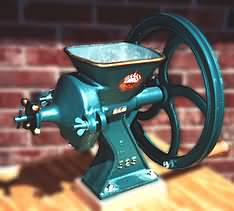
It is a monster of a mill, the largest of the Big Three. It has the largest burrs at 5.25″. That doesn’t sound much bigger than 5″, but that equates to 10% more grinding surface, which means 10% more throughput in theory. The whole mill is cast iron, designed and built to last forever, as far as I can tell. The cast iron has been painted inside and out, and the mill is attractive, in an old-fashioned way. The flywheel is the largest of the Big Three, and by far the heaviest. The mill has no ball bearings, but it doesn’t seem to need them. It seems to be the easiest of the Big Three to keep it going, probably because of the leverage of the large diameter flywheel and also because of its weight, which gives momentum. I can grind hard wheat into a fine flour with one hand, but I have to change hands every 25 revolutions. With two hands, I can grind all day. In practice, the mill has very good throughput, and it only takes a few minutes to get enough fine flour for a loaf of bread or a batch of pasta.


The Diamant allows easy and precise adjustment of the grind, and there is a positive, hand-operated lock ring that keeps the setting right where you set it. There is no slippage on this mill. The only augur is a large grain-busting screw augur. It seems to work fine for all materials, and it moves everything out towards the burrs. No material is left in the bottom of the grinding chamber, so it is easy to start grinding another material without contaminating it with the former material. The cast iron burrs grind flour as finely as any of the Big Three. One can buy specialty burrs; in addition to the standard (fine) burrs, you can get coarse and extra fine, each at extra cost, about $130 (2010 prices). I have no experience with coarse or extra fine burrs.


The dust cover that covers the burrs and contains the setting mechanism comes off in seconds after loosening two thumb nuts. The front burr slides off the main shaft, then three screws hold the rear burr, as in the Country Living mill. If I ever wanted to give the inside a good cleaning, I’d need a screwdriver handy. The mill comes with a free screwdriver, so that’s not a problem. I don’t do peanut butter or grind other oily materials with the Diamant, so I haven’t had to clean it. It would easily do those materials, but I can’t get organic peanuts over there, so I don’t. Like the Country Living mill, the Diamant’s flywheel has a “V” to allow you to motorize it some day. I hope I never have to, but I can.

  1.  

    Diamant D.525 Problems

    There are a few problems with the Diamant. It has a comfortable two-fisted handle, but as I wrote above under the Country Living mill, you have to watch where you put the mill to avoid catching the handle in your groin as you walk past. The mill is very heavy, so you need something substantial to bolt it to (no clamp is available, nor could I imagine one strong enough to hold it down). It is also the largest of the Big Three, meaning a little more trouble finding a spot for it. Lastly, it is impossibly expensive in the USA. Except for the cost, these few problems are surmountable, and I am very happy with the Diamant. It can grind anything to fine powder, it is easy to turn, and it just keeps going and going.


    So, I had my good mill in the overseas house, but I still needed a good mill here in the USA apartment. I wasn’t excited about the Country Living mill for the reasons mentioned above, and I couldn’t afford the cost or the space requirements of the Diamant. I thought I was stuck. I borrowed my friend’s Country Living mill and tried it again. I wanted to like it; what other choice did I have? It still made good flour, but now, a few years after I first used it, the mill was getting harder to turn at the fine setting. I looked at the burrs, and they were showing some wear. That wear translates to more friction, which means more effort to turn the handle and more heat generated during grinding. Heat is our enemy when grinding fresh grains. Enough heat can denature the natural oils of the grain. I also got reacquainted with the problems I mentioned above. So, I wanted to like this mill, but I couldn’t. I started another search, and I found my answer: The GrainMaker mill!

    Original Review done by Craig MacDonald.

Country Living Mill Review

I still hadn’t settled on a workable mill for our home overseas. A friend here in the USA received a gift of a Country Living mill. We tried it and found it could grind a fine flour. It was attractive, seemed well-made, my artist friend was impressed with the mill’s “sand-cast” [carbon steel] burrs, and the mill was sold by a wide variety of outlets on the Internet — although there didn’t seem to be any price competition between them. Don’t waste your time looking for the best buy. In my search, they were all within about $5 of each other, when you included shipping. I made bread and pasta with this mill, when I could borrow it from my friend for a weekend or so. If you want to grind other materials than wheat and similar grains, you need to buy the optional nut and bean augur for about $36 extra. And don’t buy the mill without the extension bar for the handle, what they call the “power bar”, costing about $25 extra. And unless you have a rectangular pan of some sort, you’ll need something like their special flour bin to catch the flour, costing an outrageous $25 (See Problem 1, below). The mill can be hard to turn on a fine grind without it. For example, I cannot turn the mill with one hand when it is set for a fine grind with hard wheat in the hopper. The standard setup has the handle mounted on the outer edge of the flywheel, but the flywheel isn’t large enough in diameter to give you much leverage, and it isn’t heavy enough to have much momentum.


The cast body is handsome and has no sharp corners or edges. Yes, it is made of aluminum, but don’t let that scare you away; it has been powder coated. The mill has replaceable sealed ball bearings for easier turning. Under normal hand use, you will probably never need to replace them, but if you do, you can. The wooden handle is comfortable and long enough for two hands. The cast iron flywheel has a “V” to accommodate a belt from a motor, so you can switch to a motorized set-up in the future. Besides being able to make a good quality flour, those are the good points. However, now that I know it intimately, I recognize several frustrating bad points of this mill:


Country Living Mill Problems

1. The overhang isn’t large enough to get a standard bowl underneath the burrs to catch the flour as it is ground. Some of the sales outlets offer a special rectangular plastic bin to use with the mill, but who wants another single-purpose plastic thing around? I like to grind the flour right into my round mixing bowl as I am making bread, but I cannot do that with this mill. A round bowl just won’t fit under the burrs, and I can’t make bread in a rectangular bin.


2. The dust cover being fixed in place over the burrs means that oily materials such as peanut butter make a mess. You can’t use your spatula to scrape off the oily materials as it exudes around the perimeter of the burrs, since the dust cover is in the way. When you get out your screwdriver (you have a screwdriver handy, right?) to remove the burrs to be able to clean them with detergent, you are still left with a hard-to-clean sticky mess inside the dust cover, and that messy area is too confined to get a spatula in there. Good luck.


3. I mention again that the standard mill doesn’t have enough leverage for grinding hard materials finely (corn, hard wheat, etc.) It would probably be fine for soft grains, like oats, rye, and certain soft varieties of wheat. An extension bar for the handle called the “power bar” is available, but costs extra. I think it should be part of the basic design.


4. The grinding chamber is painted inside, making me wonder if I’ll be eating some of that paint as it slowly breaks down over the years. I wouldn’t worry about the inside of the hopper, also painted, because it won’t be subject to much wear and tear like the inside grinding chamber will be.


5. A nut/bean augur, necessary to grind materials any larger than wheat, like corn, beans, nuts, etc. is available, but costs extra. If you are only going to grind wheat and similar grains, you won’t need it. But with a mill this capable, wouldn’t you want to use it for everything you can? Peanut butter comes to mind.


6. The standard augur is a spring that doesn’t reach the bottom of grinding chamber. Consequently not all the material you have dumped into the hopper gets pushed out to the burrs. Thus when you stop grinding, there is a layer of grain left in the bottom of the mill. How are you supposed to get it out when you change materials, say from wheat to sunflower seeds? Well, either you unbolt the mill (no clamp is available) and turn it upside down and shake it, put it back up, and rebolt it, or your take off the adjustment screw, take off the outer burr (watch out for the tiny metal key that holds the burr to the shaft! It is easily lost), get a screwdriver, and take out three screws that hold the inner burr, remove the inner burr, remove the spring augur, now try to dig out the stuff you don’t want mixed into your sunflower butter, then put it all back together. Careful, don’t strip the threads of the aluminum body when you tighten the steel screws to hold the rear burr. Do you still have the tiny metal key? Good, put it on the shaft, then slide the other burr onto the shaft with the slot going over the key, now screw back on the adjustment screw, and voila! Does that seem like too much trouble? It is, since there is a better choice that I will tell you about later. It wouldn’t be too much trouble if this were the only mill out there, but it is not.


7. The 5″ grinding plates do a very good job. They have enough surface area to have a good throughput, they are massive enough to absorb the heat, keeping it away from the flour, and they seem sharp enough when new. The problem is they have an estimated life of only 3-4 years under normal one-family use, they are warranteed for only one year, and it will cost about $100 to replace them. I foresee a mill that keeps costing more and more over its lifetime.


8. The adjustment knob can slip, and that fine flour you started to grind is suddenly coming out as cracked grain instead. There is a fix that involves sanding the shaft to give it more friction. That fix won’t last long, and then you’ll have to start using an extra nut as a locknut on the end of the shaft (requiring a wrench to set it). That makes the adjustment process cumbersome. Who wants to keep a wrench handy to change the grind? But I guess you already have a screwdriver handy, so why not a wrench, too?


9. The two-fisted wooden handle can actually be too long. Depending on where you mount a Country Living mill, that handle can stick out into traffic patterns. It doesn’t feel good to catch that handle with your groin.


10. Finally, a minor problem of aesthetics: the Country Living mill uses two common hardware store washers behind the fineness adjustment knob. They are supposed to help keep the fineness setting from slipping, but as I wrote in problem 8 above, this washer system has problems. Moreover, they are not an elegant solution.


So I was disappointed in the first of the Big Three serious mills. I decided not to buy a Country Living mill to take overseas. Yes, it could do the job, but isn’t there something better? Yes, there is: the Diamant D.525.


Original Review completed by Craig MacDonald

Comparing Flour

We start out with the coarsest grinds on the left and progress to ever finer flours as we move to the right. The finer the grind, the better the gluten will develop – the better the flour for bread making.


  1. This is wheat after the first pass through the Corona or Victoria grinder. The wheat is just cracked. Some whole kernels of wheat make it through.
  2. Wheat after a second pass through the Corona or Victoria grinder. It’s finer than the first grind, but still has the coarseness of cracked wheat. The Corona and Victoria mills are not good grinders for bread making.
  3. This is Germade, which is included as a reference point to give you some idea where the surrounding flours are on the scale.
  4. This flour is from the Back to Basics or Family Grain Grinder after the first grind. In my opinion this flour is still too coarse to make good bread.
  5. This flour is from the Back to Basics or Family Grain Grinder after the second grind.
  6. Flour from the Diamant, Little Ark with burrs, and Silver Nugget with burrs. This is not a super fine flour but good enough for bread making.
  7. The Silver Nugget with Stones.
  8. The Little Ark with Stones.
  9. Flour ground with an impact grinder – almost the consistency of white, processed flour. This sample, coming from an electric grinder, was also a reference point to compare the other flours to. It’s a little darker in color than white flour because of the wheat bran but if you conduct a ‘Pinch Test’ you will feel very little difference between the two flours. The Silver Nugget, The Little Ark, and the Country Living Grain Mill are capable of producing flour as fine as this on a tighter setting–though production of flour is measurably slower.
  10. White, processed flour –bleached and nutritionless–included only as a reference point.

Grind Test Chart

Grind Test Chart

From top to bottom: The Country Living, The Nugget, The Little Ark, The Back to Basics, The Family Grain Mill, The Corona and the Diamant.

Click on the chart in the above gallery to view a larger version.

[1] With power bar extension handle

[2] Minutes and seconds required to grind one cup of flour at 60 RPM with stones or burrs set at .005 inch. The Family Grain Mill and Back to Basics Grinder burrs were set tight.

[3] Minutes required to grind 10 cups of flour. This time included putting wheat through twice with the Family Grain Mill and Back to Basics Grinders because of their coarse grind on the first pass.

[4] The Country Living Mill will produce a talcum-powder fineness of pastry flour on one pass, but the speed of production is greatly reduced.

[5]The Diamant will make a fine grind with only one pass, but the Diamant test administrator chose to grind the wheat in two passes as he feels it easier to grind this way.

[6] There will be some variation in cost from vendor to vendor

This is a newer chart that I have found comparing another mill, The GrainMaker Grain Mills to the other USA mill the CLM, The GrainMaker is another American made mill and the company pays close attention to keep the whole machine using 100% USA made parts.

#116 GrainMaker Mill with optional custom Bodine Motor

GrainMaker No.116 with Bodine Motor

Brand Name GrainMaker® #99 GrainMaker® #116 Country Living
Warranty Lifetime (Including Burrs) Lifetime (Including Burrs) Lifetime (Only 1 year on Burrs)
Burr material Machined alloy steel Machined alloy steel Cast carbon
Burr size 5″ 6″ 4.75″
Pulley Size Custom 12″ Custom 14″ Industrial 12″
V pulley Yes Yes Yes
Hopper Size 6 cup 10 cup 4 cup
Bearing type USA Sealed & Shielded Ball bearings USA Sealed & Shielded Ball bearings Shielded ball bearing
Weight 20 Lbs 55 Lbs 15 Lbs
Extension bar/handle Standard Standard Optional(24.95)
Auger for large grains Standard Standard Optional(39.95)
GrainBreaker Auger(for large or hard grains) Standard Standard NO
Handle type Rotating wood Rotating wood Rotating wood (Recently Up-dated)
Clamp Optional Standard No
Cup per minute 1 cup 1.5 Cups 3/4 cup
Consistency of flour Fine/crack Fine/crack Fine/crack
Finish Red powder coat Red powder coat White powder coat
Made in USA USA USA
Disassembly of burrs: Front No tools needed No tools needed No tools needed
Rear stationary Burr No tools needed No tools needed Tools needed
Loose pieces when burrs comes off(washers, shaft keys) No No Yes
Total cost $675.00 + shipping $1200.00 + shipping $491.90 w/ auger& ext. handle + SH